

Our daughter recently had her very first "friends" birthday party for her 4th birthday. I wanted her to have lots of fun yet I had to stay within a pretty tight budget. I was able to throw a fun birthday party for my daughter and her 9 guests and guess how much I spent................................................................?????
UNDER $15 DOLLARS PEOPLE!!!!!!!!!!!!!!!!!!!!!!
You are all probably well aware of the "pinterest" birthday parties that everyone thinks they have to replicate. Yes, I see the gorgeous birthday party table displays and start drooling over them myself. They are so fun to look at. Did you catch that? They are so fun to look at! I can't imagine trying to duplicate something like this:
 |
| source |
Or this: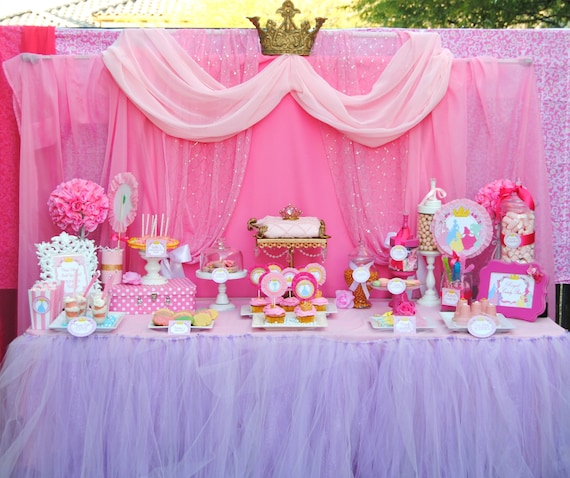 |
| source |
The amount of time and energy spent on something like this for a 1, 2, 3, or 4 year old just baffles me. Now, I'm not trying to shoot down anyone who has actually thrown a party like this. Some people are GREAT at throwing parties like this for their kids, they love spending the time doing it. And I applaud you! I wish I could do something like this! It looks so fun and special.
But you know what? I am not the best at paper-crafting 30 cupcake toppers, or coordinating matching glass gumball displays, or tying tulle to 50 yards of twine to hang as a banner. That stuff drives me nuts.
When I was growing up, my birthday parties were simple. They were inexpensive. I don't ever remember having any decorations up for birthday parties. I don't ever remember a table set up with all sorts of treats and candy. And we NEVER gave out birthday favors to our guests. I even have home videos to prove it.
What I DO remember is all the FUN I had! I remember having friends there who shared my special day with me. I remember my mom and dad were actually participating in my birthday party, helping us play simple games like musical chairs, etc. My mom was never in the kitchen busy whipping up those last dozen cake pops. She was PRESENT!
I have always remembered that and have wanted to make sure that I am PRESENT for my kids' birthday parties. Yes, you do have to put some effort into planning a child's birthday party. But it doesn't have to be torture! And you don't have to spend a lot of MONEY or TIME doing it!
So, let's see my suggestions for:
$ THROWING A BIRTHDAY PARTY ON A BUDGET $
My two favorite places for buying party supplies, favors, etc. are Dollar Tree and Target. By far I get the most from Dollar Tree (or any Dollar store).

My daughter wanted a princess-themed party. We bought a pack of $1 party invitations and I hand-wrote everything in plus included a little insert about what to wear (we wanted all the girls to wear princess dresses). Then we hand-delivered them to save on stamp costs.
(*Note: I made it clear that we had extra princess dresses for girls that may not have one, I didn't want anyone to have to buy one for the party. Don't require things of your guests that require them to spend money just to attend the party!)

The party was 1.5 hours long so I needed some crafts/games to entertain several girls ranging in age from 2-7 years old. The Dollar store sells packages of beads for $1 and we decorated foam crowns with glitter, stickers, and plastic jewels. All the supplies were $1 each and I only had to buy one pack of each type of supply.

See those glitter containers above? Those were only $1 from Walmart! They worked out so well!

Each girl got a princess wand as well ($1 for a pack of 12 at the dollar store).

We kept the decorations simple using $1 crepe paper (also from the dollar store, they even had a princess themed roll). While this was pretty simple to do using tape, it made a big impact, making our living room seem like a Princess Ball room. I didn't buy any balloons.


I hung up some banners I already had on hand from Target that I bought a couple years ago. I LOVE their banners in their party section. They are less than $5 and come in a variety of cute colors, prints, patterns, etc. Way easier and cheaper than making one myself too.

We wanted our Princess Guests to put on some princess jewelry when they arrived (and they could keep the jewelry and take it home). I bought a pack of bracelets, rings, and necklaces, all for $1 at the Dollar Store. Each pack included several pieces of jewelry.


I bought princess crowns for $1 and birthday sticker boxes as party favors for $1 at the Dollar Store. I originally wasn't going to do party favors since I don't think they are necessary but decided to let the kids take home some princess jewelry. Plus, what kid doesn't like stickers?

Not the most adorable display, but hey, I used what I had on hand. A hanger held the necklaces just fine so each child could choose their own color.


This felt birthday banner has become a favorite at our house. I always hang it up for birthdays. It cost $5 at Target a couple years ago, but I see it there every time I go to their party isle, in fact, it was there just last week. Get one!

To save on food costs, I decided to make home made cupcakes with home made frosting. It was simple and easy. I served apple juice with them. I only offered one kind of treat at the party so kids wouldn't over eat or waste food. It was easy and simple. Kids don't need an entire plate-full of treats and candy.

The cake stands I used to display the cupcakes I already had. The mint one was from H&M home online for under $10. The white one was an old cake stand I found at a thrift store, then came home and spray painted it. I love them!


Here's the Princess Birthday Girl!! She was so adorable in her princess costume.

We made a "throne" using a kitchen chair, our Christmas tree skirt, and an old silver bridesmaids skirt I had. It was easy to do but made a big impact. We played some fun games using this throne.


As the girls arrived at the party, we had them make crowns at the table. They loved it!


Look how cute these princesses are! None of these girls asked why I didn't have a lavish table set up, or 10 different kinds of birthday treats. They just enjoyed each other and the games we played.

The first game we played was musical chairs. I used to play this at my birthday parties all the time. Instead of taking a chair out each round though and making girls feel like they got "out", we kept all the chairs in place for each round, but if you got to sit on the "throne" when the music stopped playing, you earned a princess wand. That way each girl got to stay in the game each round, and have fun trying to sit on the throne. We had to play 2 separate times since there were twice as many girls as we had chairs.

They like their princess wands!

Then we played "Hot Slipper" just like Hot Potato. I used one of my daughters dress up princess shoes and we started handing the slipper around the circle as music played. When the music stopped, whomever was holding the glass slipper had to sit out and watch. The last remaining person won a $1 magic princess towel from the Dollar Store. We played 2 rounds of this game as well.


Then we opened up presents. I think it's important for kids to understand that everything's not always about them. In this case, it was my daughter's birthday so she was the one opening up presents, but if she goes to other parties or it's someone else's birthday, she needs to sit there and watch them open up presents without becoming too sad that she doesn't get anything.


We even dressed our 1 year old up in a princess dress. Here she is playing "peek-a-boo" with the other girls.


After opening presents, the princesses got to eat cupcakes and drink apple juice. I had bought $1 princess paper plates and $1 princess paper cups. The Dollar Store has party isles that are themed for your convenience. So there was a princess section among many other types of birthday themed supplies.


Our 1 year old even got in on the cupcakes!


If you follow me on Instagram you saw that I wore my old choir dress from high school (I knew I should hold on to it!). I thought it would be fun to dress up too. I tied a ribbon around my waist, and used a stretchy black head band for my choker (I had to safety pin it in the back to keep it tight). One of the girls even asked if I was Cinderella!

Once the party was over clean up was a breeze. We simply pulled the crepe paper down and pulled the plastic table cloth off the table and threw them away. Easy!
Here's a recap of what I spent money on for the party:
$1 invitations
$1 paper plates
$1 paper cups
$1 princess crepe paper (I already had the other colors)
$1 necklaces
$1 bracelets
$1 rings
$1 princess crowns
$1 sticker favor boxes
$1 princess wands
$1 foam crowns
$1 beads
$1 foam heart stickers
$1 plastic jewels
$1 glitter
= $15 total
Now if you cut out the party favors, jewelry, and craft items it would be $5 so it's totally up to you how much you spend depending on what games or crafts you plan on doing.
Be creative and see if you can use items you already have, sometimes I have even kept the cheap plastic table cloths and reused them. The throne we made was simple and easy using items we already owned, and it made a big impact.
Throwing a fun party for your child is doable and doesn't need to cost you a lot of money or take you a lot of time preparing for it. I was able to enjoy the party myself and be there "in the action" to witness my daughter having a fun time.


